Showing posts with label recycle. Show all posts

Tuesday, September 6, 2016

THE PUNK FAERY ARTWORKS


This is the work of Somerset artist, Sally Jacob, who trades under the name - 'the punk faery artworks'.  She is a fantasy artist, whose artwork explores the darker/steampunk side of faery.  Her current work focusses on mermaids and faery creatures, exploring fairy tales and the psychology behind them...


She also designs and hand makes unique and bespoke accessories and jewellery in her steampunk style.  They usually contain a combination of vintage components, found objects and her imagination!  Her latest jewellery collection embraces the trend for raw gemstones and pearls mixed with cute woodland themed pieces.

Sally's work is currently for sale in the One Craft Gallery until the end of October - see pics above.


Monday, August 15, 2016

HAUSER & WIRTH MAKES A GOOD DAY OUT!


I went with some friends to the famous Hauser & Wirth art gallery in Bruton. The exhibitions show contemporary  internationally-known artists.  At the moment it is Martin Creed, a Turner Prize Winner.  It was interesting, but I have to confess that some of the mixed media installations - piles of rubbish taken from his flat, and old cars parked in the gallery, were lost on me!  I could have done with some of his thoughts to decipher what he was trying to say!


However, it is an exciting place to visit - full of creative ideas and recycling. I love the bar (seen above right and middle left) which was made, out of scavenged materials in honour of the artist Dieter Roth, by his son and grandson.  Also look at the washing facilities for the toilets - top right!

It is also a good place to eat - the Roth Bar & Grill serve fresh, rustic, local produce.  The vegetables and herbs used come from their own raised beds, and they serve meat reared on the farm that contains the gallery.

The gardens, which have been landscaped by Piet Oudolf, a Chelsea Gold Medallist, were looking fantastic.  At the end of the Oudolf field of drifts of perennial flowers and grasses was The Radic Pavilion - a temporary fibreglass structure designed by Smiljan Radic - see below.  It had an intriguing organic shape which was very beautiful and would make a great party venue...


Monday, November 16, 2015

CHRISTMAS IS COMING!


Some of the shops in Shepton Mallet, my home town, have started decorating their windows to show off their Christmas goodies!  I shall be doing the gallery's Christmas window with Caroline, a fellow member of the co-operative, next week and I am looking for ideas!  Above are a couple of recycling ideas - how about the Father Christmas made out of polystyrene cups and for an exterior decoration, here is another use for old car tyres! Pictured above is one of two tyre 'planters' seen on an exterior wall of a shop in town.

This last weekend I have been decorating some gift bags and brown luggage label tags to go in the gallery...


Wednesday, December 17, 2014

MIRROR MAKEOVER

I bought an old mirror in a junk shop.  I was attracted to the simplicity and width of the frame. I painted the frame with gesso before using matt acrylic medium to collage layers of black and white patterned paper and photocopies of  a waxed paper with text on facts about fish and chips that I had acquired, with permission, from a fish restaurant in Jersey.  For the next layer I drew the outline of fishes with a felt tip onto tissue and applied.  I then added copied word game tokens and made up linked words that all connect to eating, drinking and fish.  After this I added more tissue fish outlines, painted the edges and gave the whole frame a layer of acrylic wax to make it more durable.  It is now destined for a funky kitchen or dining area!

Close-ups of some of the detail around the mirror.


Sunday, November 2, 2014

TREE DECORATIONS


I have turned my attention to making christmas decorations, cards, etc. with the gallery in mind.  I have developed a simple idea to make tree decorations out of recycled materials - ice lolly sticks, toilet roll cardboard cylinders, lace and string.  I used PVA to glue the pieces together.  They were painted with gesso and acrylic paint and finished off with silver glitter glue and a punched out silver star.


I have kept to a monochrome colour scheme - white with black or grey wash or black with a white wash, but I could imagine these in other brilliant colours and decorated in different ways. I find the simple shape pleasing and can see it as a basis for christmas cards, wrapping paper etc.


Sunday, October 12, 2014

AUTUMN LEAVES

Seeing the leaves around me turn to rich autumnal colours and swirl around in the wind has inspired me to make some paper leaves for window dressing in the gallery.


I started with recycled brown wrapping paper which was crumbled and ironed before acrylic colour was applied to both sides.  I then sponged on raw umber acrylic and randomly stamped on leaf vein shapes.  I then cut out the leaves using two different shaped templates as a guide. The edges were then burnt using my soldering iron - a piece of equipment that I haven't used for a long time!

The leaf garlands were formed, by gluing paper covered wire, to one side of the leaves using PVA.  Once dried they can then be bent to look as they are being blown in the wind.  I shall be using them in the gallery for the next window design.


Sunday, July 20, 2014

DIY PAPER BUNTING

I have developed two methods to make quick and simple paper bunting. Both methods require paper with interest on both sides - old books due to be scrapped are ideal. For example, I have used an out of date road atlas and a child's book. I then cut out simple triangle shapes using my own templates - see map bunting template illustrated. These shapes were then painted on both sides with acrylic wax available from Art Van Go. This coating gives the paper strength, durability and allows you to sew into it.


The next stage is to use a ruler and black marker pen to outline two sides of the triangles. Finally for the map bunting, I turned the top edge over and machine stitched it making a channel to insert the rope. For the child's bunting I used one inch wide braid which was ironed in half and the triangles inserted, tacked and then machined stitched. This bunting has been used to help with window dressing in the gallery. I haven't yet decided what to do with the map bunting.


Monday, July 14, 2014

RECYCLING ARTWORK

Top row shows the right side and bottom row the reverse.
My bookmarks have been selling well so I quickly made some more for the pop-up shop which we have just had at a local Open Gardens (see July 4th post). To save time, I recycled bits of artwork that were destined to be cards but never made it and some hand collaged cards that were damaged.  With some cutting, glueing, embellishing and sealing with acrylic wax they were ready to have gift tags added.  I add gift tags so that a personal message can be added and a bookmark could be sent instead of a card.


Wednesday, March 12, 2014

GIFT TAGS

I have just been making some more gift bags for the gallery.  I often use luggage labels or make my own tags to hang from them.  However, I have noticed that they can be inclined to curl, especially if they are in the window in warm weather.  To get around this problem, I decided to use flattened toilet paper rolls to form firm pockets to put in blank cards for messages.


The method I used for these tags was to flatten the roll, and punch a half circle out at one end (see above).  The roll was then dry brushed with white gesso. Old sheet music and napkins were stuck on with matt acrylic medium and a few paint details added to both sides.  I then used a smaller round punch to cut into some gummed paper and stuck this circle on the inside of the roll - exposed by the semi circular cutout.  A leather punch was then used to make the inside hole to take the string.  To finish off, I ironed the pocket flat, taped the bottom together with masking tape and added a blank card which had the end cut with pinking shears.  These tags could be used on their own with a gift wrapped in brown paper, coloured tissue or even sheet music!


Tuesday, March 4, 2014

DECOUPAGE MAKEOVER


The most unprepossessing thing can get a completely new lease of life with a decoupage makeover.  It just takes time, patience and some interesting papers to make a scruffy old object into a sculptural piece - as this toy horse shows.  It was done by 12 year old Lilly Lang who did the fabulous decoupaged stool - see Sunday, October 23rd post on Funky Decoupage.

Lilly had seen a beautiful patterned horse in a gallery, which was way over her budget, so her father bought her a plastic toy horse in a car boot and she put the time and effort in to create this lovely 'art' object. She found it very fiddly to do, especially as it had moving limbs which had to be put into a set position.  Perhaps wrapping masking tape around the horse first, to immobilise it, might have made the job easier.  It sticks to plastic and creates a good surface to adhere the papers to.  The colourful papers were all carefully cut from glossy magazines.


Wednesday, December 4, 2013

TREE DECORATIONS

Various stages of making plus dove template.
I have just made a driftwood tree, and need some suitable decorations to go on it, as it is going to our local Baptist church for a tree festival at the end of the week.  In the name of recycling, I have been collecting the cardboard rolls left when the kitchen and toilet rolls have been used.  Usually these go into cardboard recycling but, having seen a few projects using them on the internet, I thought I would test them out.

I flattened the rolls and stuck on torn up sheet music and paper patterns, with matt medium, on both sides.  I then designed and cut a template of a peace dove, which I used to draw the outline for cutting through both layers of the roll. They were then glued together, incorporating a string tie.  The finishing touch was outlining the shape with a black marker and using glitter glue on both sides.  I also did the same, using a wooden star as a template, and punching a hole to take the hanging tie (see below).

Text was added to luggage labels and given the same glitter glue treatment.


Monday, November 25, 2013

SWEET PAPERS 2

In the days when I used to eat sweets, especially at Christmas, I could never bring myself to throw away the wonderful brightly coloured cellophane and foil wrappers.  I have, over the years, used them in various projects. On the blogpost of May 2nd entitled 'Sweet Papers',  I show how I incorporated sweet papers into an artwork.  I do find it them quite hard to glue down so another solution is to tack them with large embroidery stitches onto a plain background material and then machine stitch on top until it is all integrated.  This can then be cut up and used as a background for cards, as illustrated below.


Here are three cards that I have just completed.  All I added to the background of sweet papers cut out with pinking shears, were punched out stars and glitter discs (these were in the bargain tub at a local craft suppliers).  I cut out a piece of paper, just large enough to leave a small border and glued all the bits on.  This was then attached, using double sided tape, to a metallic card.


Sunday, November 10, 2013

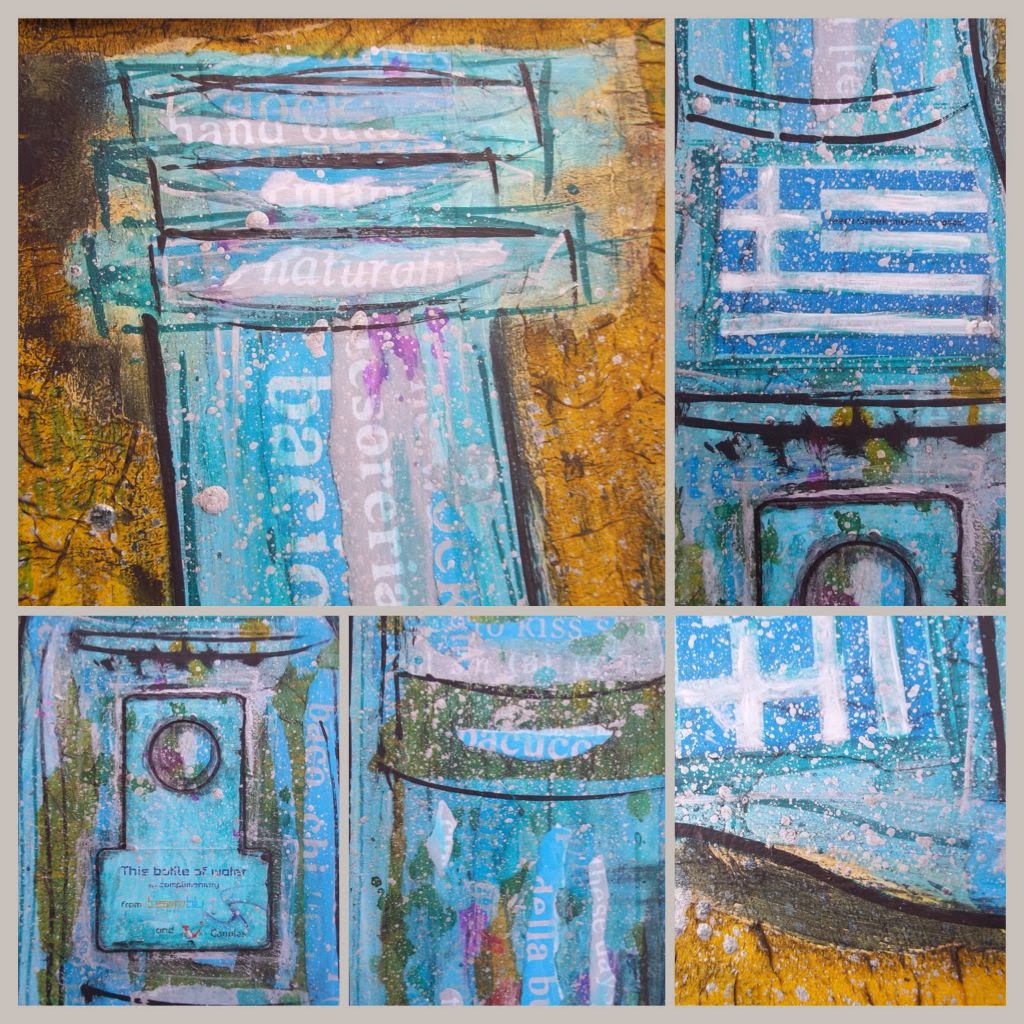
TEROSO BLU BOTTLE

When I was on my recent holiday in Greece I collected loads of ephemera - paper napkins, table mats, tickets, labels, notices, etc., to use in a piece of artwork when I got home. I had the idea of doing a long thin bottle and looked around for a suitable background.  As I try and recycle whenever I can, I searched among my stock of frames, canvases and boards to find something with the right dimensions. I found a stainless steel frame, without glass, that someone had given me, so I decided to use this and did the artwork directly onto the hardboard backing.  All the papers I used for this piece came from the fabulous hotel we were staying in.  The name of the hotel is the Teroso Blu, which means blue treasure in Italian, so I used this name for my bottle picture.  A constant reminder of my holiday!

Close-ups showing layering of papers, paint and inks. 

'Teroso Blu Bottle'  - mixed media (91cms x 32cms)

Sunday, October 27, 2013

FUNKY DECOUPAGE

Recycling and upcycling has been popular for many years - people making use of things that would be otherwise thrown away.  You can find many exciting ideas on the internet and when I was looking I came across Sasha Constable who cofounded the Peace Art Project in Cambodia (PAPC) in 2003.  This started as a sculpture project turning weapons of war into artistic expressions of peace.  Now fantastic furniture is being made using guns, swords and other destroyed weapons.


A simple idea to make a piece of tatty brown furniture into something quirky, fun and a delight to have in the home, is to decoupage it.  I know decoupage has an old fashion reputation but it can take on a modern twist - such as this stool above.  Beautifully executed by Lilly Lang, who was featured with her denim bag in my previous blog - the seat is covered with cartoon characters. She loves it and it now lives in her bedroom.  I can see this girl as a mixed media artist of the future!

There are a number of great  modern decoupage papers out there now but it is more original and personal to recycle your own old maps, books, stamps, playing cards, vintage magazines, letters, music etc. - anything that can be stuck down flat over wood. Why not add your own words and doodles on top before layering on the varnish which will protect the surface from wear and tear. I am going to have a go at decoupaging some old drinks coasters.


Wednesday, October 23, 2013

RECYCLED DENIM BAGS

Lilly Lang with her 'eco' bag.
Above is a selection of bags that I have made from recycled denim.  Regular readers will know how I love old, worn denim and have over the years collected, bought or been given many pairs of old jeans, skirts etc.  I try and use all I can without destroying the original garment or I cut them up and mix and match to make a bag. Little girl skirts and small jeans are particularly useful.

Many denim items have embroidery or a bit of bling on them which make great features for the bags.  I also like to incorporate working pockets and use contrasting materials for the linings. Waist bands can make good handles and I generally use magnetic catches to fasten the top openings.  I try and inspire others to make their own bags and someone who has done just that is Lilly Lang, aged 12, who made one for a school project. She says "it is fun to create something which fits the project title of 'eco' bag."


Thursday, August 8, 2013

DENIM DOLLS

I love using denim for projects, particularly old worn denim.  Over the years I have bought denim clothes from jumble sales and charity shops.  Also, people who like the idea of recycling, have given me their old jeans and denim jackets.  I have used them for making bags, cushions and textures under artworks, all of which I will feature in the future, but for this blogpost, I want to show you the rag doll I made, inspired by a child's denim dress with an embroidered collar.

Dolly lounging on a sofa with a cushion that features the seams of old jeans.


I wanted my doll to be useful, as well as decorative, so there is an opening at the back of the skirt, so that plastic bags can be stored and it is decorated with useable pockets from old jeans.  She is quite tall - 3ft 3 inches, and her face is hand embroidered.  I have read somewhere that, when making dolls, the creator tends to use their own features and colouring. I instinctively didn't think of making the eyes anything but blue, and I have been told there is a resemblance in the face!  The hair is strips of muslin and the ears have eyelets punched in them with stationery rings hanging from them. During the making she somehow acquired a cleavage, cowboy boots and a personality!  When it came to a name there was an obvious choice - Dolly, after the fabulous Dolly Parton.


Hippy Chick sporting her new wellies.

       
Dolly now has a friend - Hippy Chick, the creation of fellow mixed media artist, Dawn Porter.  Hippy Chick's body is also based on a denim dress filled with plastic bags.  Her face is hand embroidered, her hair is made from sari silk and she is 3ft 5 and a half inches tall.

I love seeing art dolls made by other mixed media and textile artists, especially those that are imaginative and have a message, such as those made by Junker Jane.  I admire those who, unlike me, make dolls of unconventional shapes and features.  I always seem to want mine to be 'doll like'!


Saturday, May 18, 2013

BEST FOOT FORWARD

Occasionally it is good to do a challenge, so when fellow artist Dawn was going to give a pair of high black patent shoes to a charity shop, we thought another way of recycling them would be to make them into a piece of sculpture.  I did one shoe for her and she did one for me.  We sanded the shiny patent and put on a layer of gesso before adding layers of paper - old papers with text, tissues, napkins and letters cut out from old magazines using matt acrylic medium.  Doing the inside of the shoes was a little tricky but we were pleased with the result.  You could cover other objects in this way, old handbags, for example.

'All seeing eyes' by Helen Thompson

'Spring in your step' by Dawn Porter

Each shoe has a message.  My shoe for Dawn was for her office with messages such as: 'all seeing eyes', 'she who must be obeyed', 'top bunny and always right' and 'the boss'. While the shoe she did for me said, 'spring in your step' and 'made for walking'.


Monday, May 6, 2013

COVERS IN A JIFFY

Padded envelopes ready for transformation
I remember, when I first got my laptop, being attracted to a case that looked like a brown padded envelope.  In the end I didn't get it, and in fact, I never got round to getting a cover.  Now that  I am doing my blog and use my mac book even more, I had the idea of making a case out of a used jiffy bag - great for recycling. I used acrylic matt medium to stick on torn up letters, photocopies of a photograph of me as a child and scraps of napkins.  I then doodled and put on layers of paint. In my recent clear up, I discovered a whole bunch of old letraset sheets which were used for graphics in the days before desktop publishing.  These were used for some of the lettering.  It was finished with a protective layer of acrylic wax.  For a fastener I have used a couple of buttons and elastic cord. I found that I needed to put a button backing on the button on the flap as the thread and needle tore into the paper and material glued on as a backing inside the case.

My computer case with two iphone covers and a more masculine phone protector.

I have also made several covers for mobile phones using vintage copies of the New Musical Express, various images including photocopies of my own work, decoupage paper, and napkins.  They then had inks and doodles applied and were also finished in acrylic wax.  Not sure how well they will stand up to everyday wear so I have given them to friends to road test! It is the magnetic bag fasteners that I have used that worry me. They hold so well that force is required to open them so that they could eventually dislodge.  As my padded bags weren't small enough, I cut them in half vertically and reconstructed them to the required size. I carefully sealed all raw edges with masking tape before starting the glueing and layering process.  If I had my sewing machine (it has gone in for service - the first time for years!), I would probably have done some stitching, especially around the outer edges, and would have used fabric braid around the outside, instead of strips of paper.

I don't think these covers are commercially viable, but they are fun to do as a personal project and I am enjoying using my new computer case.


   ,